
You are using an out of date browser. It may not display this or other websites correctly.
You should upgrade or use an alternative browser.
You should upgrade or use an alternative browser.
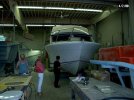
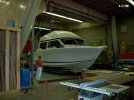
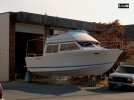
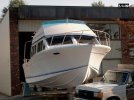
Commander 26 Re Build
- Thread starter Sttr
- Start date


Sttr
Crew Member
I want to say 27k in 1980,That's interesting. I wonder it retailed for in '79?
1986 was 40k I been told.

Fisher_dude
Crew Member
it’s all I could think of when you said marine land. You’re welcome for getting it stuck in everyone’s head.
Sir Reel
Well-Known Member
They had a very small shop and staff making these boats. Morley said he had pretty much had the same crew for 25 years and you see that in the consistency of the buildI googled the address 3400 Lysander Lane ( marine land yacht sales)and it took me to the small street between deckside marina and the sunlife financial building, a very familiar place for me. Don’t really know the history of marineland or how deckside marina came to be.
Attachments
MikePA
Well-Known Member
IncredibleThey had a very small shop and staff making these boats. Morley said he had pretty much had the same crew for 25 years and you see that in the consistency of the build
Sttr
Crew Member
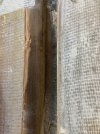
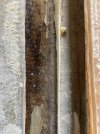
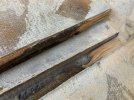
Finally got to remove some of the stringers. Kind of wanted to check into all of them. The outer ones I quickly realized were bone dry, found a layer of foam under one of the stringers. The inner one that I thought was the worst I started to cut out until it was dry, the stringer was solid but damp 2/3 up the boat and was dry towards the bow but grey on the outside. There is still a big gap between the stringer and the hull so I’m sure fuel got up there also. The other inner stringer, I cut another foot out and the bottom of the stringer was wet, that’s the worst out of all of them. I might of been quick to pull the trigger on replacing all the stringers, the outter ones look immaculate, I think I’m going to keep them.
 Outter stringer
 inner stringer towards the bow
 inner stringer towards the bow
 nails in the stringer, outter stringer
 outter stringer
Outter stringerinner stringer towards the bowinner stringer towards the bow nails in the stringer, outter stringeroutter stringerAttachments
SpringFever2359
Well-Known Member
Here’s a few pages from the binder I got with the commander. Explains the boat pretty well. One of the bulletins is from 1979, this boat has been cruising these waters before I was born LoLView attachment 77824View attachment 77829View attachment 77830View attachment 77831
79' ? Before you were born.. ..dam you just made me feel realy old lol...
Very nice build so far, we all can't wait to see her finished and on the chuck
Last edited:
Sttr
Crew Member
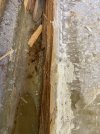
Besides the stringers, here’s some pics of where we are at today. The sides of the deck are finished with 2 more mats on top of the ply. I have enough corebond left to finish the remaining few feet but I want to save it just in case I need it somewhere else right now. The bow deck is done with 2 mats and then a layer of roving. I also couldn’t help myself and removed the rest of the stringer.


Sttr
Crew Member
Here’s a few pics of how we did the deck. It was almost impossible to prop it up straight after I took so much off. It was just bending whichever way it wanted to. Ended up gluing pieces of wood on top of the deck, put some weight on it to secure it. After that we were able to prop it up straight with no issues. The shaped formed really well with no visible high/low spots, I’m very happy with the outcome

Rayvon
Well-Known Member
Your not at this point yet,but back in the 70's ( I was born long before then) when I worked on yachts ,we always put 1/2" foam behind any bulkheads or anything else that was glassed to the hull sides to stop it telegraffing to the outside when the glass cures and sucks the bulkhead tight.We didn't bother with stringers etc. on the bottom because the layup was thicker and no one will see it anyways.Looking good.
Aces
Well-Known Member
What about scuppers?There’s nothing going thru my transom, except pod mounting hardware
Aces
Well-Known Member
I over built an old glass hull like you’re doing and would do it again. Knowing exactly what you have under your feet is very satisfying. I love the ride of my old Hourston and it always impressed clients that owned their own boatsI would have to start another thread why I chose the commander, I think rain city already did that.
First of all I want new power. I never gone wrong with new things. Next are my options for a boat, can’t be just a fishing boat. I had aluminum, I want fibreglass. My cheapest new option for what fits my needs is a 24 cutwater coupe. One 250 yammy, no helmaster ex, one might judge finishing workmanship, nice boat, narrow, light, fast, no flybridge, 225k with taxes last years price. And that is my budge on this boat, will see if we keep it.
I want a 26 commander not 30 because I want a 30 under slip. The commander is a beast and a legend of a boat imo, I want the widest, heaviest boat this size I can get.
It started off with new power, pod ,tank, and bringing the interior back to life…. A good 10 year plan imo to run new power on a comfy boat…It turned into this some how
It’s not just a old boat, it’s a commander
")
Sttr
Crew Member
The 26 commander has no transom scuppersWhat about scuppers?
Aces
Well-Known Member
Don’t you think yours should have some to be self bailing?The 26 commander has no transom scuppers
Sttr
Crew Member
They are on the sides of the hullDon’t you think yours should have some to be self bailing?

Sttr
Crew Member
These are 3 choices I came across for bonding my stringers to the hull. Foam and a mix of cabosil and resin was used during production and the stringer was not fully bonded to the hull. It still lasted like this for 40 years and would of been mint if it was glassed all the way to the end. From what most people are saying, I’m thinking the most important thing is to seal the stringer.
First was the micro balloons and talc, this is all in stock but I don’t want to experiment with mixing ratios on my stringers, but sounds like a solid option
Second option was cabosil and strands.
Third was polybond B46.
Reading up on polybond it seems it’s made for this and is super easy to use. Will go with the polybond
Capt_Ed
Crew Member
Are you planning on putting stainless fittings in the deck and outletsThey are on the sides of the hullView attachment 77968
Similar threads
- Replies
- 37
- Views
- 5K
- Replies
- 2
- Views
- 369
- Replies
- 7
- Views
- 738
- Replies
- 11
- Views
- 2K