Refurbishing a 1992 Grady White 246G Explorer

It's not marine grade. Depends where you put it. Good point though, I'm putting it in an enclosed cabin. It would not be a good fit for a boat that doesn't have a cabin you can control temperature and humidity in.
Yeah, I've finally made the determination that in the PNW if it doesn't have an IP rating/designed for marine it shouldn't go on my boat. I try and keep it dry and run the fan/heater but there are weeks were I don't and even nights on the hook where it get's pretty moist inside. When looking at the chinese heaters I determined I didn't want to change them out every 3-4 years, as it looks like guys who moore their boats might have to do as the mother board and connections are not well protected? So tempting with this 1/10th the price. I bought my lowrance NEP-2 used for less than 1/2 the price of new. Raymarine seems even more pricy https://amzn.to/3ZGIogN #ad
 
When I have been diving into the DFF-UHD vs using the onboard for a 1KW, it appears that the processing is different because it is done at the black box. I don't anticipate going deeper than 1000 ft. What I was reading is that the processing handled at the UHD will give better resolution and discrimination. The hope for me, would be out on the shelf in about 600' being able to discriminate between mud and gravel. Finding areas of rocky areas for Lings vs gravel for Halibut, and mud for wasting my time. My old Garmin XSV with a GT51M was useless at these depths. I only knew that I was not fishing any more when I could feel the pipe jig going into the mud as I pulled it out. I have some marks, but the reality is that I don't know why they produce and I feel a bit like some of that style of fishing has been random which which is what I want to fix.

I previously looked into this as I had a DFF1-UHD (i.e. chirp) block box paired with a original TZTouch14 and was wondering if there would be any advantage in keeping the black box if I upgraded to a TZT3 or TZTXL which have built in Chirp sounders. The consensus from Furuno and people who had tested both was that while the settings (gain, TVG, etc.) might be slightly different when optimized, the end results were the same and the block box wasn't needed if you had a built in Chirp sounder.

Bottom discrimination ("BD") is a separate matter. If this is something you want / need, you will need to have at least one CW (i.e. fixed frequency) transducers with a DFF1-UHD+ (which is essentially the built-in sounder in the TZTXL). Note that with the DFF1-UHD+, only one CW transducer can be used in the setup and the returns from that transducer won't be shown (just the BD results).

The other option for BD would be to add a the BBDS1 module with its own dual frequency CW transducer - this should give better results over the above example as the sounder needs to compare returns from two different frequencies to determine bottom hardness, and this is easier with fixed frequencies. While Chirp is great for detail and separation, it falls behind when it comes to determining bottom hardness since it broadcasts over a range.

Note that BD is limited to 100 m / 330' (per Furuno), so would not be applicable in your example.
 
Lots happening and I am bad at posting.

Got the main tank out. It has been I installed prior to the dock and was 1/2" longer the the opening. A saw fixed that. Tank looks good. No pitting. A few rub marks where there were bubbles in the glass in the floor.

The floor is only glasses on the top. Wet plywood. It is coming out and will be replaced.
 

Attachments

  • 20260214_094243.jpg
    20260214_094243.jpg
    262.7 KB · Views: 94
  • 20260214_094411.jpg
    20260214_094411.jpg
    294.7 KB · Views: 93
I ordered electronics. All furuno. 16XL. Placing it will be a serious challenge but no sense getting a high resolution system if the screen us the weak link.

Most of the canvas is ok, but all the seams were coming apart so I have been re-sewing all the seams. Replaced about a dozen snaps.

The bolts at the bow pulpit were leaking so it has been removed.

I am worried about the rails leaking. I don't see how to access them yet. Maybe I will get lucky.
Not all rails are through bolted if that’s what you mean. I’ve seen quite a few just screwed. I resealed all of mine last year and it was just screws .
 
After getting the first tank cleaned up, I do see a bit if corrosion. All on the top of the tank.I will get some G-Flex epoxy to repair them. To paint the tanks I am thinking Pettit epoxy. I will pick up some Co osa for the new floor for the tank. I am also seeing that the limber holes need some work. I end up with a small puddle of water that gets trapped and it should be bone dry. These tank holds have zero ventilation. Seems odd. Any ideas on that? The corrosion started small and got bigger as I cleaned it with a wire brush.
 

Attachments

  • 20260214_113544.jpg
    20260214_113544.jpg
    138.3 KB · Views: 69
After getting the first tank cleaned up, I do see a bit if corrosion. All on the top of the tank.I will get some G-Flex epoxy to repair them. To paint the tanks I am thinking Pettit epoxy. I will pick up some Co osa for the new floor for the tank. I am also seeing that the limber holes need some work. I end up with a small puddle of water that gets trapped and it should be bone dry. These tank holds have zero ventilation. Seems odd. Any ideas on that? The corrosion started small and got bigger as I cleaned it with a wire brush.
Somehow you should measure the depth of the pitting, compare to tank thickness Picture looks deep. Might want to consider replacement.
 
I agree that I need to examine more. That pic is the worst of the main tank. I will chase it and measure when i get to the end. Still using up the gas in the aux so I can pull it and check it out. I am currently optimistic.

I re-attached the pulpit today. Not all the hardware was bedded when I took it apart. I did a proper job with 3m 4000. Still a bit of work to do on the bow joint.

I start semi-retirement next week and will only work part time so should be able to spend more time on this project.
 
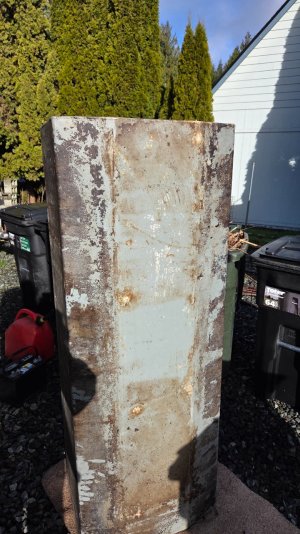
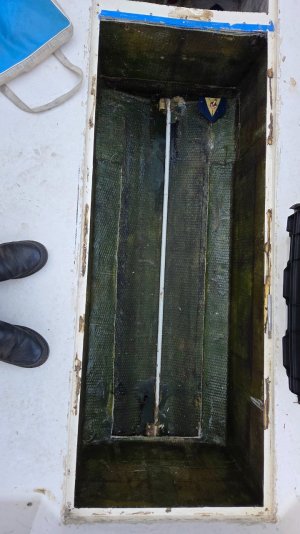
When I got to the second fuel tank, it was worse than the first and I decided to go with new tanks. I am working on final size but am ordering new aluminum tanks in 3/16th thickness. They should outlast me.

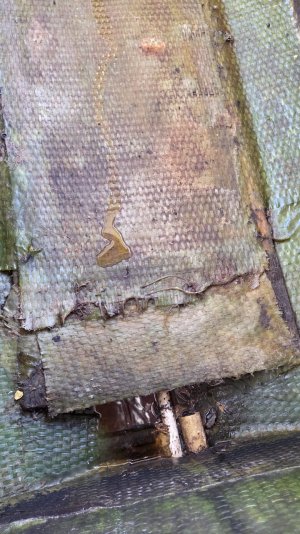
I have almost everything taken apart now, and am close to starting the putting together process. I still have not been able to get the scupper hoses off the through hulls. I don't want to destroy everything, but that may be what I need to do. Some of the through hulls I just broke off with my hand. I took out the floors under the tanks, and the water tank needs to be replaced too. I removed the ladder and the trim tabs so I can re-bed them with 4000 UV. Everything looks really good but I was shocked at the electrolysis that had hit the trim tabs. They are not bonded or have anodes on them so they turned into sacrificial Stainless. I will still reuse them as they still work fine and have a new pump. I removed one of the slider windows and will do the other tomorrow. A bit more wire and fuel hoses need to come out, then I can really start putting things back together.

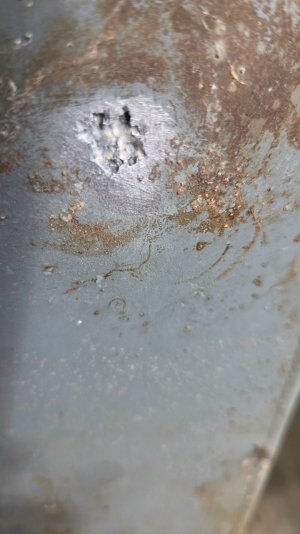
a couple of those pin holes in the trim tab pic go all the way through.

20260331_152607.jpg

I enlarged the Limber holes a bit in the bulkheads and put epoxy on them.

I confirmed that the rails have though bolts on the bases. since the bolts are about an inch longer than the need to be, I think I will loosen them, pry up the base, clean as best I can, put down some caulk, then tight them back up. The access path is only 2" on some of them so I am hoping that I can reach with a swivel and long socket. If I lose a nut, I don't know how I would get it back on the bolt.

I did jump ahead and installed one of the transducers.20260323_162303.jpg

I have also decided that a new trailer is in order. I don't think this one is worth repairing. I am thinking Load Rite aluminum.

Still no unexpected bad news, so I am happy so far. the transom has been dry everywhere I pull a screw. My biggest fear was that I would find soggy wood somewhere but so far, only the floors under the tanks which is no big deal. got the Coosa board in hand, just need to install it.

The biggest challenge I think I have ahead of me is that I need to build an electronics box because I can't find anything that will work. I will need to put the 16" screen at a bit of a down angle, or it will block my vision a bit when I am standing. If what I build does not work for me, the other alternative is to raise the top a few inches. I think I can just unbolt the top from the aluminum tubing, and add some aluminum tubing to raise it. Thoughts?

I will be shortening the main fuel tank so I can access the front bolt of the fairing for the transducer. I had to cut off part of the internal block because of a bulkhead. the front bolt is on the other side of that bulkhead. That B265 is a beast. Still need to install the 165 on the other side. 20260323_162512.jpg

I am thinking that maybe I put a small 2 gallon diesel fuel tank for the Webasto heater in that space.

I still have a June 1 target date.
 
1775145957404.png
Thanks for this pic as it answer a question I have about the 3/4in drain pipe from the front bulkhead to the aft. Currently this pipe is plugged the last 4 inches in the aft from when Grady built the boat and left a pile of resin there and backed up in that pipe . I have a plan to try to clear it and if that does work I will have to pull my 100 gallon tank and go from there. Pic shows there room to work on the 3/4 pipe on the other side of the bulkhead.
 
Last edited:
A couple more now that the floor is out. The1/2" goes all the way to the cabin.
 

Attachments

  • 20260403_173721.jpg
    20260403_173721.jpg
    175.3 KB · Views: 19
  • 20260403_173805.jpg
    20260403_173805.jpg
    192.9 KB · Views: 19
View attachment 125524
Thanks for this pic as it answer a question I have about the 3/4in drain pipe from the front bulkhead to the aft. Currently this pipe is plugged the last 4 inches in the aft from when Grady built the boat and left a pile of resin there and backed up in that pipe . I have a plan to try to clear it and if that does work I will have to pull my 100 gallon tank and go from there. Pic shows there room to work on the 3/4 pipe on the other side of the bulkhead.
I had a very similar problem, but for me it was the 1/2" pipe that wouldn't drain from the forward cabin. I assumed that something must have got lodged in there, bit in reality it must have never worked as move was plugged in the aft bilge with a thick layer of resin. Was a super hard job to unplug but glad I did it.
 
Interesting Im not the only one here then.. its a **** show to get at and alot of work and have the daughters boy friend doing the work.I hoping to have it all done this weekend. I'll post some pic and start a thread shortly
 
Last edited:
Interesting Im not the only one here then.. its a **** show to get at and alot of work and have the daughters boy friend doing the work.I hoping to have it all done this weekend. I'll post some pic and start a thread shortly
I was head down in the bilge for a few hours reaming out the resin from the PVC. Goodluck!
 
Back
Top