Fiberglass and Gelcoat Repair

Rain City

Crew Member
Hey guys,

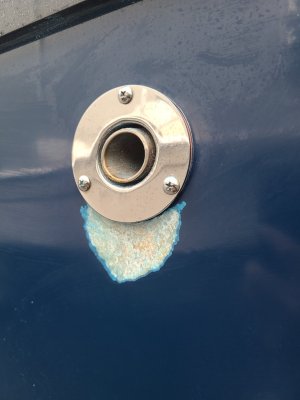
I noticed a 1-1/2" crack below the heater exhaust with some slight bubbling around it. I assumed there was some water that got in and froze and caused some delamination. That or the guy who drilled the hole was a complete hack and just blew it out. Either way, I did some grinding today thinking that it would be a small gelcoat repair. As it turns out, the separation was about an 1/8" in within the glass itself. I kept grinding until the loose area disappeared and now I'm left with this. My question is, can this be filled with thickened gelcoat or do I need to patch the glass first? Would resin alone do the trick or would I need mat or fibers? What's the right way to tackle this thing? 20250929_131100.jpg
 
From what I've learned lately I would say a layer or 2 of chop strand mat and polyester or vinylester resin and then gel coat. Not sure how much sag you will get with the gel coat on its own, I have limited experience with it. "Boatworks today" on YouTube does a good video, I think working on a dark blue dingy.
 
Hey guys,

I noticed a 1-1/2" crack below the heater exhaust with some slight bubbling around it. I assumed there was some water that got in and froze and caused some delamination. That or the guy who drilled the hole was a complete hack and just blew it out. Either way, I did some grinding today thinking that it would be a small gelcoat repair. As it turns out, the separation was about an 1/8" in within the glass itself. I kept grinding until the loose area disappeared and now I'm left with this. My question is, can this be filled with thickened gelcoat or do I need to patch the glass first? Would resin alone do the trick or would I need mat or fibers? What's the right way to tackle this thing? View attachment 121542

Remember reading awhile back of a guy named Ron that was good with fiberglass repairs 😎
 
Be a lot easier with the through hull exhaust removed. Start with thin small circles of csm, working bigger to fill the void. Csm is tough to sand fair, some fairing compound on top is much easier than going too proud with the chop. Matching the gel coat is the tough part imo.
Also I’d be replacing at least the outer gasket to a thicker more heat resistant one.
 
Last edited:
Be a lot easier with the through hull exhaust removed. Start with thin small circles of csm, working bigger to fill thr void. Csm is tough to sand fair, some fairing compound on top is much easier than going too proud with the chop. Matching the gel coat is the tough part imo.
Also I’d be replacing at least the outer gasket to a thicker more heat resistant one.
That's the plan when I eventually tackle the repair (removing the fitting). This was just an exploratory dig to see how far the crack and delamination went. I want to make sure I remove the whole crack so it doesn't transfer through the repair again later. If that's a thing. I don't think I'm going to attempt to match the gel coat. I'll likey put a vinyl sticker or better yet a round stainless plate over it (thanks to a members suggestion). This is the only reason I'm even attempting to tackle this myself, I would touch a final paint match solo.
 
Play on here to find your make and colour maybe.
If you can find an exact gel colour match, then you can feather it out to the right amount.

 
Be a lot easier with the through hull exhaust removed. Start with thin small circles of csm, working bigger to fill the void. Csm is tough to sand fair, some fairing compound on top is much easier than going too proud with the chop. Matching the gel coat is the tough part imo.
Also I’d be replacing at least the outer gasket to a thicker more heat resistant one.
so remove exhaust, build up and fill completely, refinish. New hole-saw and better gasket-ing. crappy this happened..
 
so remove exhaust, build up and fill completely, refinish. New hole-saw and better gasket-ing. crappy this happened..
Hard to say without removing through hull, but from the picture I see no reason to fill in the old hole just to re-drill it. Use the top of the hole as is for blocking it out fair. Like most tasks on a boat it’s usually much more involved than originally anticipated, although this one looks fairly simple. With proper products utilized correctly it should only take a couple hrs of labour, less cure time.
 
Fiberglass and especially gelcoat repairs are tricky if you are looking for a repair that blends back into your existing hull including matching the blue colour. Sometimes, especially where a nice finish is the desired outcome, its just better to bite the bullet and pay a pro. Also, a poor repair could lead to big troubles down the road if not done properly and water gets in between the layers of gelcoat and glass causing a delamination.
 
Fiberglass and especially gelcoat repairs are tricky if you are looking for a repair that blends back into your existing hull including matching the blue colour. Sometimes, especially where a nice finish is the desired outcome, its just better to bite the bullet and pay a pro. Also, a poor repair could lead to big troubles down the road if not done properly and water gets in between the layers of gelcoat and glass causing a delamination.
Yes my thoughts exactly
 
Back
Top